Apr 12, 2012 | Tips and Tricks
HELPFUL HINT – To double-check the size of a photo (or anything else), right click on the start button, and choose “Explore.” This gives you a “tree” of everything in your computer. Find the photo, right click on it, and choose properties.
Using Elements or Photoshop:
With the photo open, click on Image (top of window) and choose resize > resize image (or Image Size). Set the resolution to 120 pixels, and the widest part of your photo (either width or height) to 1024 pixels in pixel dimension. Click OK.
Using Lightroom:
With the photo open, click on File > Export and export the photo to the folder you choose. (Be sure to name your file according to the LPS naming convention discussed here.)
Follow the steps shown in the screenshot below:
- From within the Export dialog box, under the File Settings dropdown menu, select JPEG for the Image Format.
- Under the Image Sizing dropdown menu, check the box next to “Resize to Fit” and make sure “Long Edge” is selected.
- Enter “1024 pixels” for the size and resolution of “72 pixels per cm.”

Click “Export” when finished and you’re done.
Using something else? Click on “Help” at the top of the window and search for (or type in the “Index”) the word resize.
Apr 11, 2012 | Tips and Tricks
TO ENTER THE KY STATE FAIR THROUGH SHOWORKS (This is the only way to enter your photos in the KY State Fair.)
Go to the KyStateFair.org page. Click on PARTICIPATE at the top of the page, and then COMPETE. Scroll down the page to the Photography category and click on the “Enter Online” link on the right side of the page. That link will take you to the page where you can register and submit entries. (The program used for entering is called “ShoWorks.”) Follow directions carefully! You must register by July 1, and the entry form and all photos are due to be submitted digitally by July 10.
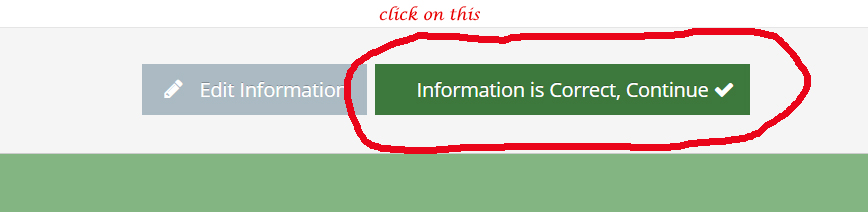
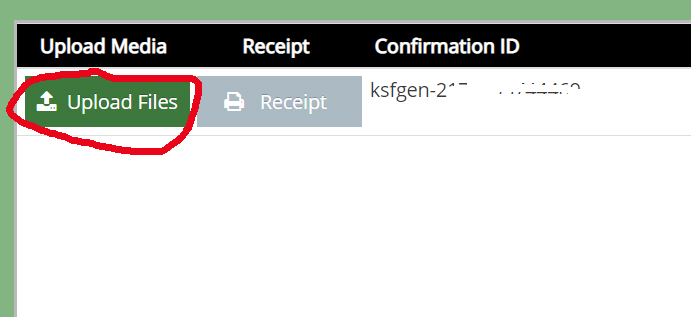
When actually entering your photos, follow the above directions, and then click on “Register” (and then “I have previously registered,” if you registered already THIS YEAR.) Then check registration information, and proceed as follows:

———————————–

————————————-

==================================
ONCE PHOTOS ARE ENTERED, THEY CANNOT BE DELETED OR CHANGED!
Classes 60, 61, 62, 70, 71, 72, 80, 81, 82, 90, 91, 92, 100, 101, 102, 104, 105, and 106 will be prejudged to determine finalists in each class. Finalists will be notified and asked to present printed versions of their photographs on Saturday, August 10, or Sunday, August 11 (the weekend before the Fair starts on Thursday, August 15.)
Do bit bring a printed photo to the Fairgrounds unless you have been notified that it has been accepted.
Tags with strings will be handed out when you bring your photo into the Fair on Saturday or Sunday. Once received, the string should be taped to the BACK of your entry in the top right corner so that the tag can be flipped to the front of the entry and appear in the top left corner. All photos not selected as finalists will be displayed on monitors in the Photography area during the Fair.
Entries selected as finalists in classes 63, 73, 83, 93, 103, and 107 (Digital classes) will have already been received by July 10. No further action is needed in these classes.
APPLYING ENTRY TAGS FOR KY STATE FAIR (Tags are not necessary for LPS club meetings):
–> Tear off the claim tag of your entry and keep it in a safe place. You will need it to claim your entry when you pick it up after the Fair.
–> Fold the bottom of the entry tag up and tuck it under the flap so that your name and any other information is hidden.
–> Turn your mounted photograph over so you are looking at the BACK of the mat.
–> Write your name and phone number at the bottom of the BACK of the mat. (Your name must never appear on the front of the mat.)
–> Looking at the BACK of the mat, tape the string of the entry tag (the string is usually yellow) to the top RIGHT corner of the back of the mat, leaving enough string for the tag to hang over the top of the mat.
–> Turn the mat over and make sure that the tag is now hanging over the top left side of the FRONT of the mat, with your name on the entry tag completely covered.
HOW TO PREPARE THE PHOTOS FOR EITHER KY STATE FAIR OR LPS:
PROHIBITED:
Glass coverings, frames, wires, clips, strings, thin poster board, Masonite, or any sticky substances felt on any part of the front or the back of an entry. The thickness of the entire entry must not be greater than ½ inch.
SIZE OF PHOTO ENTRIES:
THE TOTAL ENTRY SIZE FOR LPS AND FOR THE KY STATE FAIR MUST BE EXACTLY 16″ x 20.” This includes the photo plus the mat. A photograph that is, itself, 16” X 20” is acceptable, as long as it is secured to a mat board or a foam core board or is a firm entry such as one on metal.) Photo prints that are 8″ X 10″ or 11″ X 14″ can be printed for a reasonable price, and are a good size for competitions. Photographs that are smaller than 7 ½ x 9 ½ are not acceptable at LPS or the KY State Fair.
PURCHASING MAT BOARD:
There are several places where 16 X 20 mat board can be purchased. One option is ordering mat board (for backing your entry) and cut-out mats is Amazon. Their prices are very good, and they can deliver quickly. NOTE: POSTER BOARD IS NOT ACCEPTABLE. Poster board is too flimsy.
DO NOT LEAVE THIS UNTIL THE LAST MINUTE!!
MATTING OWN YOUR PHOTO:
A photograph can be placed on the mat board with masking tape rolled inside-out. This is called “floating.” But you must be sure that the photograph is secure, and the mat board is sturdy. It is a cardinal sin to have your photograph fall off of or out of your matting. Double-sided tape or spray-on adhesive can be used, but is often not “sticky” enough. A strong mat board should be used or the result will be too flimsy. Poster board is not acceptable. Do not tape the photograph to a single mat board that has the photo area cut out where the photo shows through, unless you place an additional mat board on the back of the entry. There is not enough protection for the photo showing through the hole without a mat behind it.
ESTIMATES OF COST:
Craft stores will usually cut an opening in the mat board for you for a small fee. The cut board can then be attached to a second uncut sturdy mat board, with your photo showing through the cut. This gives the entry extra strength. The cut board is attached to the second board with duct tape which is used as a hinge. Mat board for backing and cut-out mats can also be purchased from Amazon.
MAT CUTTERS:
Do-It-Your-selfers can get their own mat cutter from any company that supplies mat cutters. I would suggest going on the internet to find the best deals. The mat cutter used in the demonstration at LPS is the “Logan Intermediate” and it runs around $149.00. A number of companies carry this brand.
“CLEAR BAGS”:
“Clear Bags” can by purchased from www.clearbags.com. This company also offers mat board in large quantities at reasonable prices. The clear bags are useful in protecting your matted photos, and can also be ordered in small sizes for people who make their own greeting cards.
“TO ASSEMBLE YOUR OWN PHOTO ENTRY”:

Apr 11, 2012 | Tips and Tricks
Several hints were given at our meeting a few years ago on how to take better floral photographs. Thank you to Lynn Shea who was willing to be a teacher as well as a judge!
- Always use a tripod.
- Photographing a flower in direct sunlight overexposes all or part of the flower, causing it to lose the detail. The same is true when photographing people. It is better to photograph flowers or people in light shade or on an overcast day. You can create light shade by using a diffuser. (A cheap way is to use a piece of wax paper! Just be sure you have a way of holding it where you want it.)
- If it is too dark in the shade, you can use a reflector to put a glow on the flower. (Cheap way— use aluminum foil as a reflector.)
 Do not center your flower. Remember the rule of thirds: If you divide your photo into 9ths, (think Tick Tack Toe) the best place for the focus of the photo is in the corners or along the sides.
- Creating a diagonal movement in the photo gives an attractive appearance. (See the lovely tulip stems in the above drawing.)
- When indoors, photographing flowers near a window gives nice soft light. Be sure to avoid direct sunlight.
- Keep your background uncluttered. This is true for portraits, also, unless you are trying to associate the subject with a specific location or mood.
- To keep the background blurred (which makes it look less busy,) use a low aperture number. But do not go too low, or all of the flower will not remain in focus from front to back. For another way, try photographing the flower in very low light and setting the shutter speed at 6 seconds, (more or less—you’ll need to experiment.) Obviously, a tripod is necessary. Note: this is not possible with a camera that is completely automatic. Other thoughts for floral photography:
- Use a tripod mounted camera with an f/22 or higher with a macro lens, or just really close, pop a strobe on it and see what happens…especially of the strobe is off to the side. If you want to blow out the background with a long lens then use the largest aperture opening you can get or with a macro, pump the aperture up to between 8-22 to get mere inches in focus. And a way to make a diffuser is with a white bed sheet, which can be stretched
- Fill the space with the subject you are photographing. Do not leave large amount of sky or background.
- If you want to create a water drop effect on a flower, you can use a spray bottle with a little glycerin in the water.
- It is usually not a good idea to cut off the tips of the petals in the photograph.
ALL THE ABOVE ARE ONLY SUGGESTIONS. RULES ARE MADE TO BE BROKEN!
Apr 11, 2012 | Tips and Tricks
It’s the astronomer’s forecast.
But also ideal for checking conditions for night photography. At a glance, it shows when it will be cloudy or clear for up to the next two days. It’s a prediction of when Louisville, KY, will have good weather.
Sample chart below (click to visit external site).
Apr 11, 2012 | Tips and Tricks
Useful for understanding your photos, mistakes, and photography in general. Note: This may be required for some of our competitions
Using Picasa:
Find the one with the photo in it for which you need the data, open the folder, and click on the photo. Then right click on the photo, and choose “Properties.” The shooting information will appear in a window on your screen. This includes the camera that took the photo, the date and time taken, the shutter speed, aperture, ISO, etc. Press the control button on your keyboard, and, while holding it down, press the “Print Screen” button on the keyboard. Close the “Properties” window, and, on the left side of the Picasa window, you should see the tab that says “Projects” and under projects, you should see “Screen Captures.” A copy (screen capture) of the Meta Data for the photo that you selected should be there. Double click the screen capture, and your data will appear, and from here you should be able to print it out. Note: You will need to add YOUR name and the TITLE you have given to your photo by handwriting it on the print-out.
Using Photoshop CS3 (and other versions)
In Photoshop, go to File > Browse. (This takes you to Adobe Bridge.) Click on the photo, and then go to View > As Details. This will allow you to see the metadata. To print the data, follow the instructions below in “Using Elements.” You can also use the steps below under Elements to find this data.
Using Elements
Open your photo in the Editor, and go to File > File Info. Click on Camera Data 1. Do a “print screen” (press the control and the print screen keys together.) Open a spreadsheet, and paste in the data. You can also paste the info into a MS Word document, but in some cases, the screen print will be smaller.
Using the Software that came with the camera:
Each camera usually comes with its own software that you install on your computer. Canon, for example, has “Zoom Browser” where you right click on your photo, and choose properties. The metadata will appear on the side of the window. Highlight all the data, copy it, and paste it into a spreadsheet (or word document.)
Using Windows “Picture and Fax Viewer”:
Open the photo, and right click on the title bar. Choose Properties > Summaries > Advanced. Do a “print screen” (press the control and the print screen keys together.) Open a spreadsheet, and paste in the data. You can also paste the info into a MS Word document, but in some cases, the screen print will be smaller. Move what you’ve pasted into the document over to the left side of the page before printing it out.
Using something else? Click on “Help” at the top of the window and search for (or type in the “Index”) the word metadata.
Apr 11, 2012 | Tips and Tricks
Know where the manual is for your camera. Keep it in an accessible place in your house. TAKE IT WITH YOU ON VACATION AND ON THE PHOTO SHOOT.
Look at the situation around you before you begin photographing. Last year’s conditions will not necessarily be the same as this year’s. Make adjustments for the conditions as they are now.
Take your first shot and preview it. Then look at the info that includes the histogram. If it is not correct, make your adjustments.
If you don’t know how to make adjustments, look it up in the manual.
If you sense there is a problem, adjust your ISO, and shoot RAW (if not already doing so.)
When shooting with a lot of light around the subject, stop down. Look in your manual to find out how to do it.
Always take extra memory cards and batteries with you on your trip. Take more batteries and cards than you think you’ll need. Excessive heat or cold will drain a battery even if it is not in a camera. If your battery runs out too quickly, take it out of the camera and then reinsert it. Download your photos at least every night onto a back-up device or a laptop, and recharge all batteries. Do not delete the photos from your used memory cards unless you absolutely have to.
Review the photos you’ve taken at least once, preferably before you go to bed (if not immediately after the photo shoot.) Figure out what you did wrong. If you can’t figure it out, read your manual.
Spend the money on a good tripod, take it with you, and use it whenever you can. An alternative is a bean bag. Per Al W’s suggestion, when going to far-away places, take an empty bean bag and buy the beans to fill it at the destination. Show bean bag and remote shutter trip.
Do not change lenses in a wind storm. If the weather has been dusty, use a UV filter on your camera and rinse it with water when finished. Do not wipe it with a cloth. It will scratch the surface.